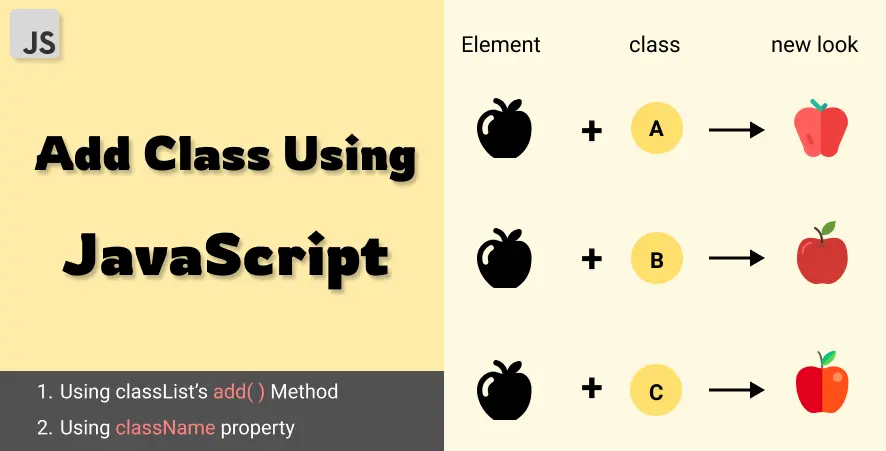
3 Ways JavaScript Add Class
In this article, you will learn 3 different ways JavaScript add class to HTML elements. You will see different variations like adding multiple classes to the element, adding class to the body, creating a new element, etc.
You can either directly add a class to the element as an HTML attribute (Ex: <p class="box">) or use JavaScript to add a class to the element (which we will see in this section).
Here is an example of adding a class to an HTML element using javascript.
- JS
- CSS
// selecting the element
let button = document.querySelector('#button');

// Add class to the element
button.addEventListener('click', function() {
  button.classList.add('.main-btn');
});
.main-btn {
border: none;
color: white;
background: blue;
padding: 10px 30px;
border-radius: 5px;
}
@keyframes shake {
0% { transform: translateX(0) }
25% { transform: translateX(-5px) }
50% { transform: translateX(0) }
75% { transform: translateX(5px) }
100% { transform: translateX(0) }
}
.main-btn:hover {
animation: shake 3 0.2s ease-in-out;
}Output: Click the button below and javascript will add a class to the button.
Click the button below.
This is a dynamic way of adding a class to an HTML element. Let's see how javascript adds class dynamically to an HTML element.
- Javascript add class
- Add class body
- Add class div
- Add class to a new element
- Add class javascript on hover
Table of contents
Add class javascript - 3 ways
While working on the front end, we often need to add CSS dynamically to an HTML element. To add dynamic CSS to an element add a class to the element.
There are 3 ways to add CSS class using javascript.
- Using classList Property
- Using className property
- Using setAttribute method
1. Using classList property
Every HTML element has a classList property. This property has many different methods. One of the methods is add() method. This method is used to add a class to the element.
element.classList.add('class_name')To add a CSS class using javascript follow the steps below:
- Select the HTML element.
- Apply the classList property to it.
- Use the add() method to add the class and pass the class name as an argument.
Example
<p id="id1">Javascript adds a CSS class to this paragraph.</p>

<script>
  // Get the element with id="id1"
  const element = document.getElementById("id1");
  // Add a class (quote) to the element
  element.classList.add("quote");
</script>Adding class javascript on an event
In general, we add classes using javascript when an event occurs. For example, when a user clicks on a button, when a user scrolls down the page, etc.
Let's see how to add a class to an HTML element when a user clicks on a button.
Example
<button onclick="addClass()">Add class to above paragraph</button>

<script>
  // add class on click javascript
  function addClass() {
    // Get the paragraph element
    const element = document.getElementById("id1");
    // Add a class to the paragraph
    element.classList.add("beautify");
  }
</script>Output:
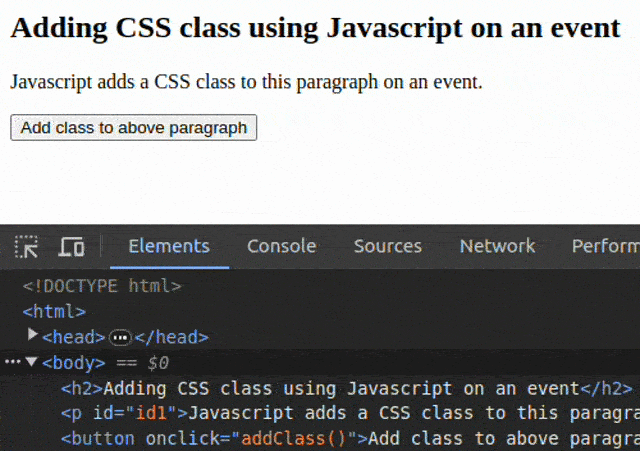
In the above code in the event of a button click a function is executed that adds a class to the paragraph element.
Add Multiple classes javascript
You can also add multiple classes at once using the add() method.
To add multiple classes at once, pass multiple classes separated by a comma.
- JS
- HTML
- CSS
function addClass() {
  const element = document.getElementById("id1");
  // passing multiple classes separated by comma
  element.classList.add("color", "border", "others");
}
<button onclick="addClass()">Add classes to above paragraph</button>.color {
color: white;
background: #4e43ee;
}
.border {
border-radius: 5px;
}
.others {
font-size: 20px;
padding: 15px;
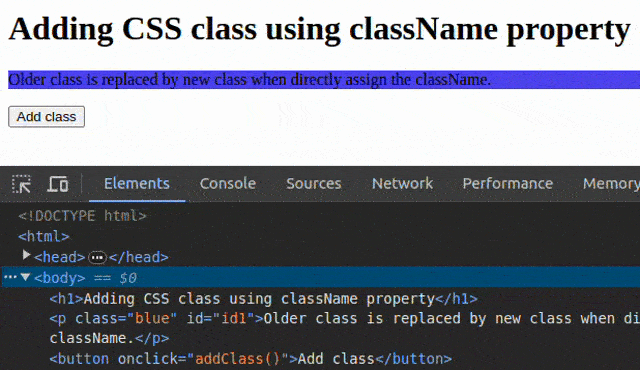
}2. Using className property
The className property of an element can be used to get and set classes attached to the element.
The className property returns the classes of the element in form of a string. If the element has a class named class1 then it returns "class1", if the element has 2 classes class1 and class2 then it returns "class1 class2", and so on.
<p class="box" id="id1">Paragraph 1</p>
<p class="big red box" id="id2">Paragtaph 2</p>

<script>
  const element1 = document.getElementById("id1");
  const element2 = document.getElementById("id2");
  console.log(element1.className); // "box"
  console.log(element2.className); // "big red box"
</script>
The className property can read as well as write the classes of the element.
To add a new class to the element assign the new class to the element's className property as a string.
Note: Assigning a class name directly to the className property will overwrite the existing classes.
Here is an example to show this.
Example
const element = document.getElementById("id1");
element.className = "box";
// all older classes will be replaced by boxOutput:
To add new classes without replacing older classes use the += operator to assign the new class. It will keep older classes and adds new ones.
Example
const element = document.getElementById("id1");
element.className += " box"; // must add space before class name
// new class added, old one remainedPossible mistake: Add a space before the name of the class when using className to add a class. Because if the element has an old class "class1" and you add the new class "class2" it becomes "class1class2" which is meaningless to the browser.
Adding multiple classes using className
To add multiple classes assign new class names separated by spaces to the className property of the element.
Example
function addClass() {
  const element = document.getElementById("id1");
  element.className += " big box";
  // multiple classes separated by spaces
}3. Using setAttribute Method
setAttribute is a method that can be used to add a new attribute to an element.
A class is also an element attribute. So we can use the setAttribute method to add a class.
The setAttribute method can be used to add a new attribute to an element. The method takes two parameters, the name of the attribute and the value of the attribute.
- JS
- CSS
// select the button
var btn = document.getElementById('btn');

btn.addEventListener('click', function() {
  // add class
  btn.setAttribute('class', 'btn');
});
.btn {
color: #fff;
padding: 10px 20px;
cursor: pointer;
background-color: #337ab7;
border: 1px solid #2e6da4;
}Adding multiple classes using setAttribute
To add multiple classes to the element pass the multiple class names separated by spaces to the setAttribute method.
- JS
- CSS
// select the button
var btn = document.getElementById('btn');

btn.addEventListener('click', function() {
  // add class
  btn.setAttribute('class', 'btn danger');
});
.btn {
color: #fff;
padding: 10px 20px;
cursor: pointer;
border-radius: 0.25rem;
}
.danger {
background-color: #ec5a16;
border: 1px solid #c74a10;
}JavaScript add class to body
To add a class to the body of the webpage select the body by document.body and use either of the 2 mentioned methods to add CSS classes.
Example
<button onclick="addClass()">Add class to body</button>

<script>
  function addClass() {
    document.body.classList.add("color")
  }
</script>JavaScript add class to div
As mentioned above you can use any of the above 2 methods to add a class to a div element using javascript.
- Step 1: Select the element
- Step 2: Use either className or classList property
Example
<div id="id1">This is inside a div element</div>
<!-- add class on click javascript -->
<button onclick="addClass()">Add class to div</button>

<script>
  const div = document.getElementById("id1");
  function addClass() {
    div.classList.add("box");
  }
</script>JavaScript add class to new element
Imagine a scenario where you want to add a new element to the webpage like creating a list item in a To Do list app. You can use the classList property to add a class to the new element.
To add multiple classes pass the class names separated by spaces to the classList.add() method.
Example
function createListItem() {
  const list = document.getElementById("list");
  const item = document.createElement("li");
  item.classList.add("list-item");
  item.innerHTML = "New list item";
  list.appendChild(item);
}Add a class on hover javascript
To add a class to an element when mouse hover use onmouseover event. Attach an onmouseover
event to the element trigger event handler to add the class.
Example
<div id="id1" onmouseover="addClass()">This is inside a div element</div>

<script>
  const div = document.getElementById("id1");
  function addClass() {
    div.classList.add("box");
  }
</script>Conclusion
Summarising the above methods to add a class to an element in JavaScript.
- Method 1: Use classList.add() Method
- Method 2: Use className property
- Method 3: Use setAttribute() method
You can add single or multiple classes to an element using any of the above methods.
If you need assistance with your JavaScript project, feel free to contact experts for getting JavaScript assignment help online.